Sale-A-Bration is here!!!

saleabration

It’s here!!  Sale-A-Bration is here!!!

 What is Sale-A-Bration (SAB)?  It’s probably everyone’s most favorite Stampin’ Up! special of the year…certainly mine!  With specials for Customers, Hostesses and new Demonstrators – there’s something fabulous for everyone!

CUSTOMERS:

What do Customers get?  FREE Sale-bration product!

  • Choose ONE free SAB product when you spend $50 (before tax & shipping)
  • Choose TWO free SAB products when you pend $100
  • Choose THREE free SAB products when you spend $150 (AND qualify for the usual hostess rewards of $25)

HOSTESS:

It’s the most popular time of the year to host a party!

What do hostesses get?  $30 more in Stampin’ Up! product with a $300 party…choose product from the current catalogs, including exclusive hostess selections!

  • $150 party = $25 Hostess Dollars
  • $200 party = $30 Hostess Dollars
  • $250 party = $40 Hostess Dollars
  • $300 party = $50 Hostess Dollars plus $30 more during SAB  = $80!

BUT WAIT!  THERE’S MORE!

NEW DEMONSTRATORS:

What do New Demonstrators get?  They get $25 more in their starter kit for just $99 during SAB.  Normally you would choose $125 of product for your kit, but during SAB you get to add another $25 for a total of $150 worth of products for just $99!!!

This is a great time to become a new demonstrator!   You get 20% discount on products, plenty of great ideas not only from Stampin’ Up! but from other demonstrators too (ask me how), and you will make great friends in the process!

I would love to have you join my team and I welcome all types of demonstrators, from the hobbyist to those who want their Stampin’ Up! endeavor to be more business focused.  If you feel that Stampin’ Up! is a good choice for you, feel free to contact me with any questions you may have.

ScallopSiggy-001

It’s finally here!!! part 1

Well it’s finally here!!!  The post you all have been waiting to read is finally here!  Our new craft studio is finally ready for some crafting magic!

Let’s start with the reminder of what it was before the transformation.

photo4 photo3 photo2When I first moved into our new house, the craft studio was just a storage room for unpacked boxes.  Well after several months of unpacking, we finally were able to empty it.  It took us a few weeks to get it fully painted.  My daughter and I did the painting.  I also went around the room before painting, taking out all of the nails and repairing the holes that were left behind.  It took so long to paint because the walls were made of wood paneling and it really absorbed each layer of paint.  We ended up painting three layers of paint because of this. 

Cleanwall1

First we had to clean the walls and repair any holes left from taking nails out of the wall.

Paint5

And the painting begins!

Paint9
BEFORE

Paint6 Paint7 Paint8

Paint1b

AFTER: One layer of paint.

RoxyHelper

My Roxy wanted to even help! Awwww….she is so darn cute!!

RoxyHelper2

Please…please…PLEASE! Can I help!!!

Paint3

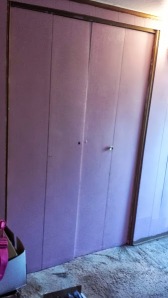
AFTER: Three layers of paint! Nice and solid pink, just the way I wanted it!!

Paint2 Paint1

I don’t want this to be too long of a post, so I am going to end this one here.  Not to worry, the second part will be coming up soon with even more picture!

Thanks for reading this post and if you want to see more pictures or see some of my bloopers, check out my Facebook page and you will get to see special pictures that I won’t post here!

ScallopSiggy-001

Its finally here!!! part 2

If your just landing here from the internet, you can read part 1 of this 2-part post here.

In the first post, we talked about the painting process.  The room is painted and now we move onto the furniture.

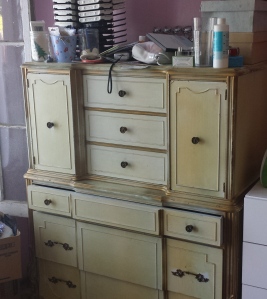
It took me about a month to actually purchase the furniture items that I wanted in the craft studio with the exception of one dresser.  This dresser is a hand-me-down piece.  It originally belonged to my husband’s step-grandfather.  His grandmother had it in storage at her home and when she had passed, we inherited this piece plus two more that we have put in our bedroom.

Dresser

Dirty with no doors!

Dresser2

Cleaned and I put the doors back on!!

I really struggled over whether or not to paint it to coordinate with the other furniture in the room, but in the end I decided against it.  Besides being a paper crafter, I am a also a genealogist and have an affection for all things that hold a story.  As you can see by the close-up pictures I took, this dresser has character.  It has years of grand kids running around, family coming over, and just a lot of love and memories.  I just couldn’t paint over that!  So it sits in the craft studio, in its original condition.

DresserCloseUp1

DresserCloseUp2

My husband and I purchased several things, most were from IKEA (the desk, bookcase, and cubes), filing cabinets and table from Micheal’s, and another dresser piece from Orchard Supply Hardware, where my husband works.  I put every single piece together myself with no help from my husband and that is just the way I wanted it to be!  My husband is such a sweetie and he let me handle this myself.  I did borrow one or two of his tools, ask him for ideas on a problem or two, but other than that, I did it all myself!

OshDresser

Dresser from Orchard Supply Hardware

bookcase

Bookcase from IKEA.

It is a small room and I barely squeezed in three people for my open house a few months ago and that is with me standing at all times!  It has already been lovingly used by my daughter and myself in several crafting sessions together and we both love it!  It is our own creative studio.  I love that everything has a place but it still needs work too.  The windows need to be re-surfaced and re-painted, but that is a project for my husband at a later date.  The one thing I don’t have up yet is my wall decor.  I had planned on using my Cricut machine to cut out a saying on vinyl, but I have yet to come across a saying that I feel needs to be on my wall.  Any ideas?  Comment and let me know your suggestions.

Also if you want to see the behinds the scene photos of me putting the furniture together,  check out my Facebook page.  I will be posting my blooper photos and things there, that you won’t see on my blog, so make sure to like my page to get the latest!

ScallopSiggy-001

The Craft Studio is Almost Ready!!

1194989524272069055do_not_enter_sign_01.svg.med

The craft studio is almost ready!!!  I can’t show you anything yet.  I just have the last few small furniture pieces to get and I have that shopping trip planned for next Tuesday.    It is all coming together and it is looking good so far!  I can’t wait to show it all to you here.

It has been a long hard journey, a journey that I surprisingly enjoyed taking.  I put my heart and soul into the design of this room and I really love how it is coming together so far.   There were a few detours, but it was brought back on track and was push forward.

So in the next week or two I will try my first video posting and (crossing my fingers that it comes out good) and will post it for you all to see.  So until then, have a wonderful weekend!!

ScallopSiggy-001

Contest Winner???

Hello my crafty friends!  I would like to thank everyone who participated in the Mystery Hostess drawing celebrating the re-launch of my blog.  We do not have a winner.  This is because we needed to accumulate $30 in hostess benefits for the drawing and we didn’t reach that.  No worries though, those who participated will not walk away empty handed.  I will be sending to them via U.S. Mail a little “thank you” for participating and celebrating the re-launch of my blog.

Again, thank you so much!  I am very appreciative of those who not only read my blog, but follow it and also follow my Facebook page.  Thank you so, so very much!!  🙂

ScallopSiggy-001